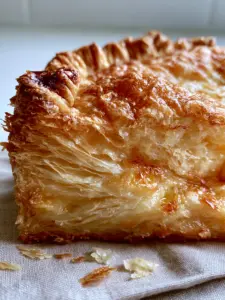
There is nothing quite like the sight of a single slice of pie being lifted from a tin, revealing a cross-section of paper-thin, buttery layers that look like they might shatter at the slightest touch. If you have ever struggled with a “soggy bottom” or a crust that feels more like cardboard than pastry, this recipe is your solution. We are diving deep into the science of lamination and moisture control to ensure every bite is a textural masterpiece.
This isn’t just another dessert; it’s a masterclass in pastry physics. By focusing on visible butter pockets and a dry, firm bottom crust, we achieve a result that looks like a high-end bakery creation but feels like a rustic, handheld smartphone photo taken in soft natural daylight. The contrast between the cinnamon-dusted apple filling and the caramelized, deeply crimped edges is what sets this recipe apart.
Whether you are preparing a full holiday spread or looking for quick recipes to sharpen your baking skills, mastering this crust will change your culinary game forever. Get ready to see stray flakes of pastry falling onto your linen napkin in the most satisfying way possible.

Why This Laminated Apple Pie Recipe Works
- Shatteringly Crisp Texture: Using a lamination technique creates dozens of microscopic layers of flour and fat that puff up in the oven’s heat.
- No More Soggy Bottoms: We utilize a specific thickening ratio for the apple filling and a high-heat initial bake to seal the bottom crust instantly.
- Deeply Caramelized Edges: The rustic, deep crimping isn’t just for looks; it creates ridges that catch the heat for a perfect, toasted finish.
- Visual Precision: Every element, from the coarse sugar sprinkles to the tiny pockets of melted butter, is designed for maximum aesthetic and flavor impact.
The Anatomy of a Flaky Pie: Essential Ingredients
High-Fat European Style Butter (226g / 1 cup): The water content in standard butter can ruin lamination; high-fat butter ensures those visible butter pockets remain distinct during the folding process.
All-Purpose Flour (375g / 3 cups): This provides the necessary protein structure to hold the weight of the apples while allowing the layers to remain tender and light.
Ice-Cold Vodka or Apple Cider Vinegar (15ml / 1 tbsp): Alcohol doesn’t promote gluten development like water does, resulting in a crust that is incredibly tender and easy to roll out.
Granny Smith & Honeycrisp Apples (1kg / approx. 6-7 apples): A blend of tart and sweet apples ensures the filling doesn’t turn into mush and maintains a slight structural bite.
Cinnamon & Nutmeg (10g / 2 tsp): These warm spices provide the classic “cinnamon-dusted” aroma that permeates the kitchen as the pie bakes to perfection.
Coarse Turbinado Sugar (30g / 2 tbsp): Sprinkling this on the top crust before baking provides a crunch that contrasts beautifully with the soft, jammy interior.
Cornstarch or Instant ClearJel (25g / 3 tbsp): This is the secret to a dry, firm bottom; it binds the apple juices into a thick syrup rather than letting them soak into the pastry.
The Baker’s Toolkit for Success
To achieve the professional results seen in our “Visual Recipe Blueprint,” you will need a few specific tools. A heavy-duty rolling pin is essential for flattening the chilled butter pockets into those paper-thin layers without melting the fat. A glass pie plate is often preferred by experts because it allows you to visually check if the bottom crust has reached that elusive golden-brown stage.
You’ll also want a sharp paring knife for slicing apples uniformly and a pastry brush for applying the egg wash that creates the toasted, caramelized finish on the crimped edges. If you’re planning a full dinner, you might also consider making some smashed baby potatoes in the oven beforehand, as they require similar roasting temperatures.

Mastering the Laminated Crust: Step-by-Step
Creating the “Rough Puff” Base
Start by cutting your chilled butter into 1/2-inch cubes. Toss them in the flour and salt mixture, then use your fingers to flatten each cube into a “shingle” rather than rubbing them in. You want to see large chunks of butter remaining.
Add your ice water and vodka one tablespoon at a time. The dough should just barely come together; it will look shaggy and dry, which is exactly what you want for a crisp, non-leathery result.
The Secret of the Folds
Turn the dough onto a floured surface and roll it into a rectangle. Fold it like a letter (top third down, bottom third up), rotate 90 degrees, and repeat. This “lamination” process creates the visible, paper-thin buttery layers described in our visual prompt.
Chill the dough for at least one hour before the final roll. This “rests” the gluten, preventing the pie crust from shrinking in the oven and ensuring those rustic crimped edges stay deep and defined.
Prepping the Cinnamon-Dusted Filling
Peel and slice your apples to 1/4-inch thickness. Toss them with lemon juice, sugar, cinnamon, and your thickening agent (cornstarch). Let the mixture sit for 15 minutes, then drain any excess liquid before piling it into the crust.
For a savory pairing later in the week, you can use similar apple-chopping techniques for a sassy scotty chicken salad that balances sweetness and protein perfectly.
Expert Tips for a Shatteringly Crisp Finish
- Keep Everything Frozen: If your kitchen is warm, put your flour and mixing bowl in the freezer for 20 minutes before starting. Cold fat is the key to those tiny pockets of melted butter.
- The High-Heat Launch: Start your oven at 425°F (220°C) for the first 20 minutes. This “shocks” the butter, creating steam that lifts the layers before the sugar in the crust can burn.
- Ventilation is Key: Ensure your top crust has generous slits. This allows steam from the apples to escape, preventing the “dome effect” and keeping the bottom crust dry and firm.
- Don’t Rush the Cool: Let the pie sit for at least 3 hours. This allows the internal pectins to set, ensuring that when you lift a slice, it maintains its perfect cross-section.
Storing, Reheating, and Make-Ahead Advice
This pie is best enjoyed the day it is made to appreciate the shatteringly crisp texture. However, leftovers can be stored at room temperature, loosely covered with a neutral linen textile, for up to 2 days. Avoid airtight plastic containers, as they trap moisture and turn the crust soggy.
To reheat, place a slice in a 350°F (175°C) oven for 10 minutes. This refreshes the butter in the layers and restores the crispness of the bottom. You can also freeze the unbaked pie for up to 3 months; just bake directly from frozen, adding about 15 minutes to the total time.
What to Serve With Your Apple Masterpiece
While a scoop of vanilla bean ice cream is the classic choice, this pie also pairs beautifully with a sharp cheddar cheese for a sophisticated contrast. If you are serving this as part of a larger luncheon, consider balancing the richness with a light cucumber salad recipe or perhaps some zucchini fritters to provide a savory, vegetable-forward element to the meal.
For those looking for a healthier dessert alternative during the week, our banana cream pie chia pudding offers similar flavor profiles with a fraction of the effort.
Frequently Asked Questions
Yes, you can store the dough in the fridge for up to 2 days or freeze it for 3 months. Ensure it is wrapped tightly to prevent it from drying out.
Use a thickening agent like cornstarch to bind fruit juices and start baking at a high temperature (425°F) to sear the bottom crust immediately.
Lamination is the process of folding layers of cold butter into dough, creating alternating layers of fat and flour that puff up into crisp flakes when baked.
A mix of Granny Smith (tart/firm) and Honeycrisp (sweet/crisp) provides the best balance of flavor and structural integrity during the long bake.
Vodka provides moisture to bind the dough but evaporates quickly in the oven and inhibits gluten development, resulting in a more tender, flaky crust.
The Ultimate Laminated Apple Pie Recipe

Pie Perfection: The Ultimate Shatteringly Crisp Laminated Apple Pie Recipe
Ingredients
Equipment
Method
- Toss cold butter cubes in flour and salt. Flatten cubes into shingles with your fingers, keeping the butter cold and visible.
- Add vodka and ice water until a shaggy dough forms. Roll into a rectangle and perform three 'letter folds' to create lamination. Chill for 1 hour.
- Roll out bottom crust and fill with apple mixture. Top with second crust, crimp edges deeply for rustic caramelization, and cut vents.
- Egg wash the top, sprinkle with coarse sugar, and bake at 425°F (220°C) for 20 mins, then reduce to 375°F (190°C) for 40 mins until golden-brown.
Notes
Allow the pie to cool completely to set the filling and keep the bottom crust dry.
Join the Kitchar Community!
We hope this guide helps you achieve the pie of your dreams! If you bake this masterpiece, we want to see those golden-brown layers. Share your photos and tag us, and don’t forget to follow our Pinterest for more culinary inspiration. Happy baking!