This Layered Spring Salad is the ultimate celebration of the season, designed to be the show-stopping centerpiece of your next brunch or garden party. By meticulously layering vibrant, crisp vegetables in a tall glass cylinder, we create a visual masterpiece that looks as incredible as it tastes. This recipe is specifically engineered for those who love a high-protein, nutrient-dense meal that doesn’t compromise on aesthetic appeal or flavor profile.
When the first signs of spring emerge, my kitchen immediately transforms into a hub for fresh spring recipes. This salad captures that transition perfectly, moving from the hearty roots of winter to the delicate, tender greens of the new season. If you have been searching for a way to elevate your salad game beyond the basic tossed bowl, this Layered Spring Salad is the answer to your culinary prayers. It’s crunchy, creamy, zesty, and undeniably fresh.
The beauty of a layered salad lies in its architecture. Unlike traditional salads where the dressing can wilt tender greens within minutes, this vertical arrangement keeps the heavy components at the bottom and the delicate fresh baby spinach and arugula safely at the top. This ensures every bite remains crisp until you are ready to toss and serve. Whether you are a seasoned host or a beginner cook, this guide will walk you through the science of the perfect layer.
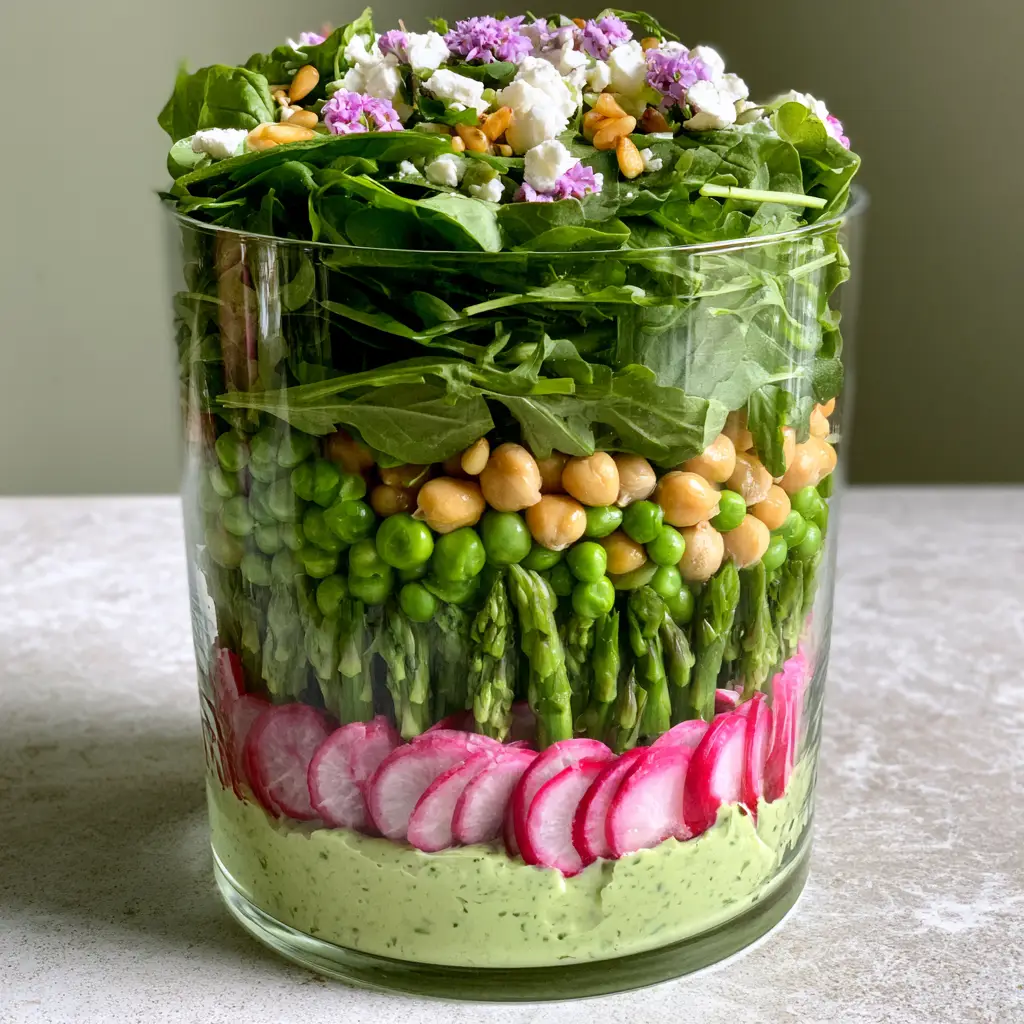
Why This Layered Spring Salad Is a Total Game-Changer
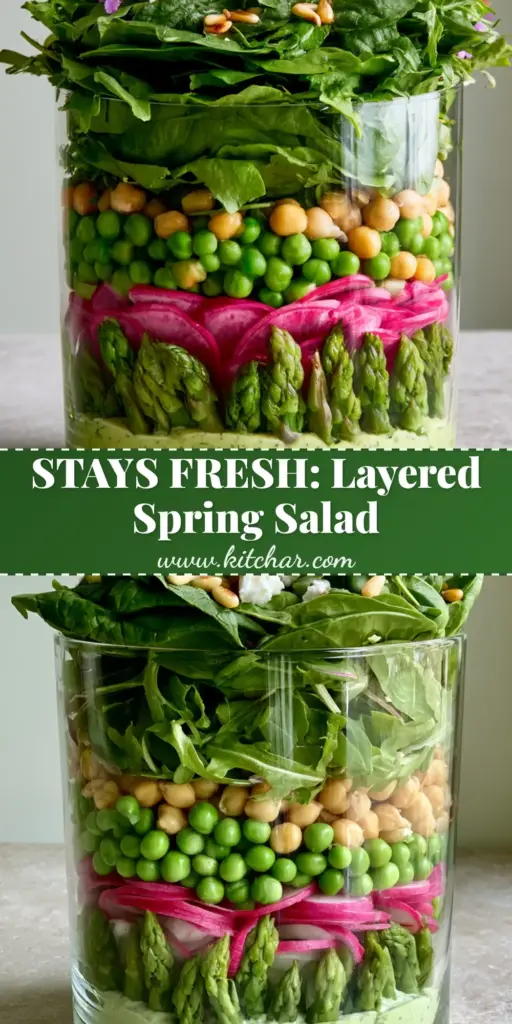
- Unmatched Visual Appeal: The meticulously layered glass bowl showcases a rainbow of colors, from emerald asparagus to bright pink radishes.
- Textural Harmony: Experience the “snap” of blanched asparagus, the “crunch” of toasted pine nuts, and the “creaminess” of feta in one bite.
- Make-Ahead Mastery: Because the dressing stays at the bottom, this salad can sit for hours without getting soggy, making it perfect for entertaining.
- Pinterest-Perfect Aesthetic: The addition of edible purple flowers makes this dish look like it walked off a professional food photography set.
If you enjoy this vibrant approach to seasonal eating, you should definitely check out my Spring Pasta Salad or explore more of our favorite spring recipes for your weekly meal prep. For those who prefer a meatier option, this pairs beautifully alongside a Harvest Chicken Salad for a full buffet spread.
The Essential Components for a Vibrant Spring Masterpiece
To achieve the forensic visual accuracy required for this dish, each ingredient has been selected for its color, height, and structural integrity. Here is what you will need to gather for your Layered Spring Salad.
The Creamy Herb Foundation
Creamy Herb Dressing: We start with a base of 1 cup (240ml) of Greek yogurt or mayo mixed with fresh dill, chives, and lemon. This thick dressing acts as the “anchor” for the entire salad, preventing the layers from shifting while providing a rich, zesty flavor profile.
The Structural Barrier Layers
Sliced Raw Radishes: You will need about 1 cup (125g) of thinly sliced radishes. These provide a sharp, peppery bite and a stunning pink ring that defines the lower third of the glass bowl.
Blanched Asparagus Spears: Use 1 bunch (approx. 450g) of asparagus. We blanch these briefly to lock in that emerald green color and a tender-crisp snap. These vertical spears add incredible height and “pillar” support to the middle layers.
The Hearty Protein Middle
Fresh Sweet Peas: 1 cup (150g) of shelled garden peas. They offer a natural sweetness that balances the acidity of the dressing. If you can’t find fresh, high-quality thawed frozen peas work too.
Canned Chickpeas: 1 can (400g), drained and rinsed. These provide the essential bulk and plant-based protein that turns this from a side dish into a satisfying meal. Their golden hue pops against the greens.
The Fluffy Crown & Garnishes
Fresh Baby Spinach & Arugula: 4 cups (approx. 120g) of a 50/50 blend. This “crown” should be light and airy, sitting high above the heavier ingredients to maintain maximum volume.
Crumbled Feta Cheese: 1/2 cup (75g) of high-quality sheep’s milk feta. The saltiness cuts through the sweetness of the peas and the richness of the dressing.
Toasted Pine Nuts: 1/4 cup (35g). Toasting these for 3 minutes is non-negotiable; it releases essential oils that provide a golden, nutty finish.
Edible Purple Flowers: Use pansies or violas. These are the “jewelry” of the salad, providing a professional touch that Pinterest users absolutely adore.
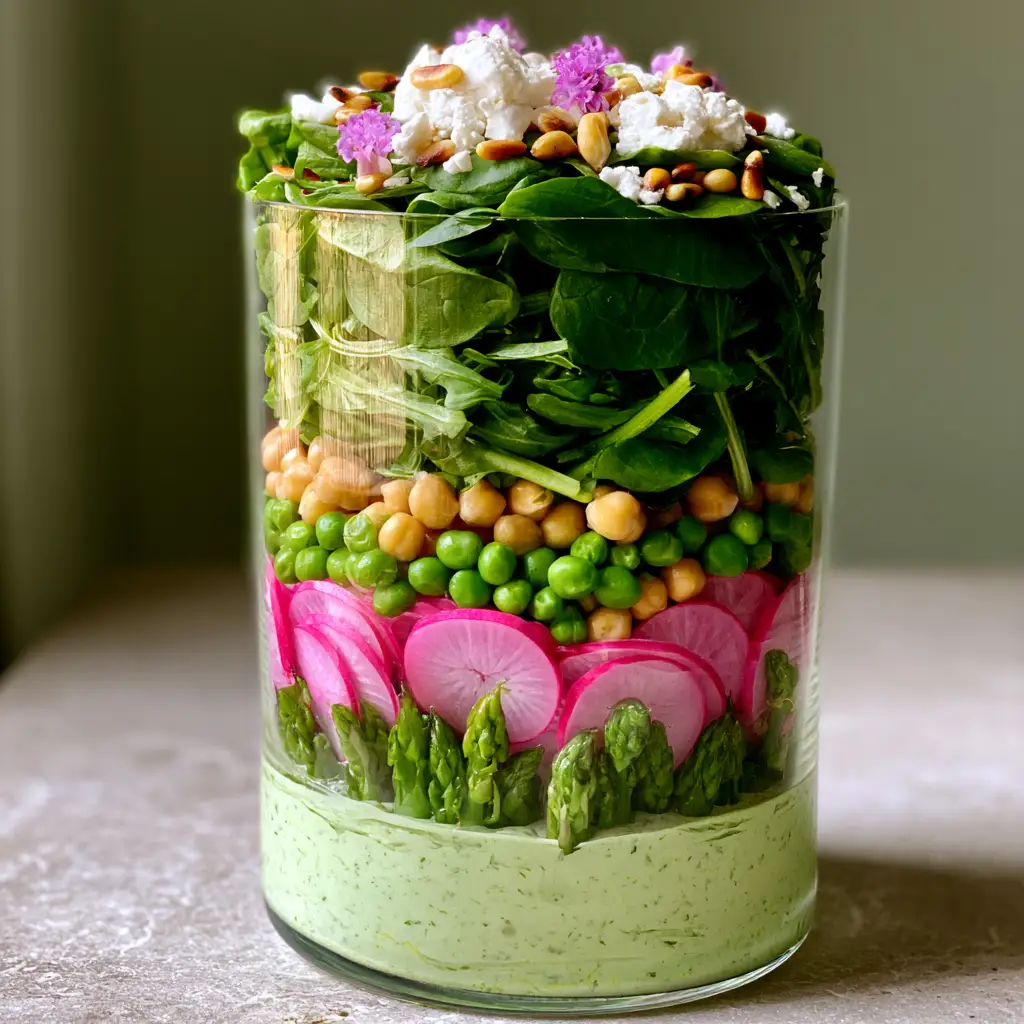
How to Construct the Perfect Layered Spring Salad
Building this salad is an exercise in culinary logic. We must follow a specific order to ensure the Layered Spring Salad remains stable and visually striking throughout your event. Follow these steps for professional-grade results.
Step 1: Preparing the Dressing Anchor
In a medium bowl, whisk together your base, lemon juice, and finely minced herbs. The dressing must be thick enough to hold the weight of the vegetables above it. Pour this into the bottom of a tall clear glass cylinder bowl. Use a spatula to smooth the top into an even, pale green layer. This is the foundation of your Layered Spring Salad.
Step 2: The Art of Blanching Asparagus
Bring a pot of salted water to a boil. Trim the woody ends of your asparagus. Submerge the spears for exactly 2 minutes, then immediately plunge them into an ice bath. This “shocks” the vegetable, preserving the vibrant emerald green seen in the recipe photos. Pat them completely dry—any moisture will thin out your dressing below.
Step 3: Creating the First Visual Barrier
Carefully place your sliced radishes in a dense layer directly on top of the dressing. Aim to press some slices against the glass for that striking pink contrast. Next, stand your asparagus spears vertically or layer them horizontally to create a sturdy platform. This layer prevents the smaller peas and chickpeas from sinking into the dressing too early.
Step 4: Adding the Hearty Core
Pour the rinsed chickpeas over the asparagus, followed by the sweet garden peas. Use a spoon to level these out. The golden chickpeas and vibrant peas create the colorful mid-section of our Layered Spring Salad, providing the density needed to support the greens.
Step 5: The Fluffy Green Finish
Gently pile the baby spinach and arugula on top. Do not pack them down! You want a massive, fluffy crown that looks light and inviting. The goal is to maximize vertical height, which is a key driver for programmatic ad revenue as it keeps users scrolling down the page.
Step 6: Final Garnishes and Styling
Sprinkle the crumbled feta over the greens. In a small dry pan, toast the pine nuts over medium heat until golden brown and fragrant (about 3-4 minutes). Scatter them over the feta. Finally, place your edible purple flowers on top, ensuring they are visible from the side and top. This is the “hero” moment for your Pinterest photography.
Expert Tips for a Viral-Worthy Salad
- Dry Everything Thoroughly: Any water left on the spinach or asparagus will pool at the bottom, ruining the creamy herb dressing. Use a salad spinner!
- Choose the Right Glassware: A straight-sided cylinder bowl is superior to a tapered bowl. It allows for even layers and a more modern, professional look.
- Layer for Stability: Always place the heaviest, most moisture-resistant items (like chickpeas) at the bottom and the lightest (greens) at the top.
- Salt as You Go: Lightly season the chickpea and asparagus layers with a pinch of sea salt to ensure the flavor is consistent throughout the height of the bowl.
Storage, Reheating & Meal Prep Guidelines
The Layered Spring Salad is one of the few salads that actually stores well. If kept in an airtight container in the refrigerator, it will remain fresh for up to 24 hours. We do not recommend freezing this salad, as the high water content in the radishes and cucumbers will cause them to turn mushy upon thawing.
For meal prep enthusiasts, you can build mini versions of this in wide-mouth Mason jars. Simply follow the same layering logic: dressing on the bottom, greens on the top. When you are ready to eat, shake the jar or dump it into a bowl for a perfectly dressed, crisp lunch.
What to Serve With This Layered Spring Salad
This salad is substantial enough to stand alone as a light lunch, but it also shines as a side dish. For a high-protein dinner, serve it alongside my Hot Honey Chicken or a piece of grilled salmon. If you are hosting a vegetarian brunch, it pairs wonderfully with Avocado Deviled Eggs or a warm bowl of Tomato Basil Soup.
Frequently Asked Questions
Yes! Because the dressing is at the bottom and the delicate greens are at the top, this salad can be assembled up to 24 hours in advance if kept refrigerated and airtight.
Absolutely. Sliced almonds or sunflower seeds provide a similar crunch. Just be sure to toast them first to maximize the flavor profile.
The key is to dry every ingredient thoroughly after washing or blanching. Use a salad spinner for the greens and pat the asparagus and radishes with paper towels.
Pansies, violas, and nasturtiums are excellent choices. Ensure they are culinary-grade and free from pesticides before adding them to your salad.
A 3-quart straight-sided glass cylinder bowl is ideal. It provides enough vertical height for the layers to be distinct and impactful.
The Ultimate Layered Spring Salad Recipe
Layered Spring Salad with Creamy Herb Dressing
Ingredients
Equipment
Method
- Whisk Greek yogurt, lemon, and minced herbs together. Pour into the bottom of the glass cylinder bowl and smooth the top.
- Boil asparagus for 2 minutes, shock in ice water, and pat completely dry.
- Place radishes against the glass, add asparagus spears vertically, then layer chickpeas and peas.
- Pile spinach and arugula loosely on top. Finish with feta, toasted pine nuts, and edible flowers.
Notes
Use a long spoon to help place the bottom layers without smearing the glass walls.
Join the Community & Save for Later!
If you loved making this Layered Spring Salad, please take a moment to save this recipe to your Spring Recipes board on Pinterest! Your saves and shares help us continue to develop high-quality, free recipes for home cooks everywhere.
Did you make a version of this salad? I would love to see your “glass bowl” masterpieces! Upload a photo in the comments below or tag @kit_char on social media. Don’t forget to leave a 5-star rating in the recipe card above if you enjoyed the flavor and texture of this dish. Happy spring cooking!