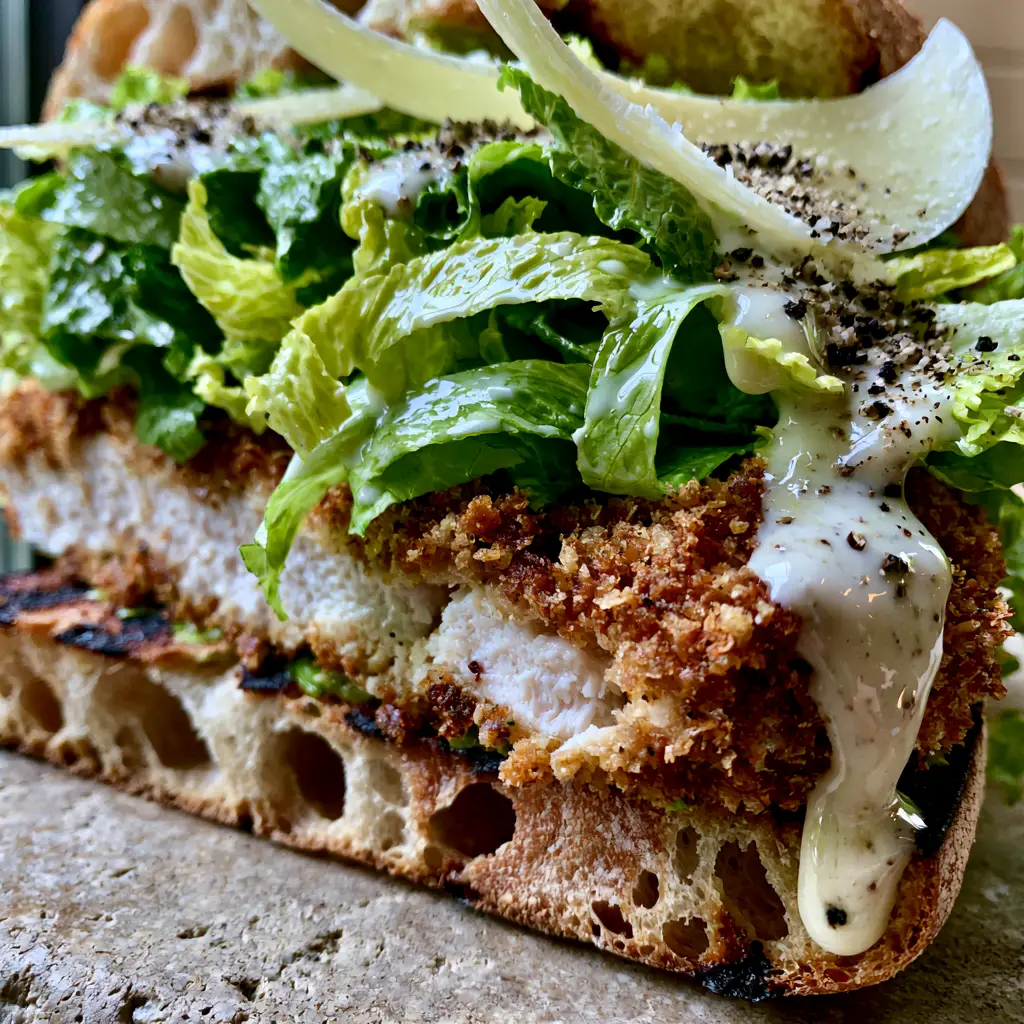
This Chicken Caesar Sandwich is the ultimate handheld version of your favorite restaurant salad, featuring a golden-brown panko-crusted fried chicken breast tucked into a charred ciabatta roll. If you are looking for that perfect bite where juicy white meat meets a shattering crunch, this recipe delivers on every level. The combination of bright green romaine ribbons and a glossy, thick white Caesar dressing makes this the most satisfying sandwich you will make this year. It is a visual masterpiece that tastes even better than it looks on your Pinterest feed.

Why This Crispy Chicken Caesar Sandwich Works
- Textural Contrast: The combination of the airy, toasted ciabatta bun and the coarse panko-crusted chicken provides a satisfying crunch in every mouthful.
- Bold Flavors: We use salty shaved parmesan curls and coarse cracked black pepper to elevate the creamy dressing.
- Juicy Results: By slicing the thick chicken breast after frying, we ensure every piece stays moist and tender.
- Restaurant Quality: This isn’t just a basic sandwich; it’s a gourmet experience designed for those who love high-quality chicken sandwiches.
The Anatomy of a Perfect Ciabatta Sandwich
To recreate the Chicken Caesar Sandwich from the visual blueprint, you need specific ingredients that offer both structure and flavor. Choosing the right bread is the first step toward sandwich greatness.
Toasted Ciabatta Bun: Look for rolls with visible air pockets. When toasted, these pockets catch the creamy Caesar dressing, preventing the bread from becoming soggy while providing charred edges for a smoky depth.
Panko-Crusted Fried Chicken: Panko breadcrumbs are larger and airier than standard crumbs. They create a “spiky” surface area that stays crispy even when topped with heavy sauce. If you enjoy this texture, you might also like our crispy chicken salad techniques.
Romaine Lettuce Ribbons: Forget whole leaves. Shredding the romaine into thin ribbons allows the dressing to coat every millimeter of the greens, ensuring you get that signature Caesar flavor in every bite.
Shaved Parmesan Curls: Instead of grated cheese, use a vegetable peeler to create large, thin curls. These melt slightly against the warm chicken and provide a punchy, nutty finish.
Essential Ingredients for Success
Before you start, gather these high-quality components. Precision is key for the best Chicken Caesar Sandwich results.
The Protein Foundation
- 2 large (450g) Chicken Breasts: Sliced horizontally into cutlets to ensure even cooking.
- 1 cup (125g) All-Purpose Flour: For the initial dredge to lock in moisture.
- 2 large Eggs: Beaten well to act as the glue for our crust.
- 2 cups (120g) Panko Breadcrumbs: The secret to that extreme close-up crunch.
- 1 tsp (5g) Kosher Salt & 1/2 tsp (2g) Garlic Powder: To season the breading thoroughly.
The Sandwich Builders
- 4 Ciabatta Rolls: Sliced and ready for a heavy sear.
- 2 cups (100g) Romaine Lettuce: Finely shredded into ribbons.
- 1/2 cup (120ml) Creamy Caesar Dressing: A glossy, thick variety works best.
- 2 oz (55g) Parmesan Cheese: Shaved into large curls.
- 1 tbsp (15ml) Neutral Oil: For searing the buns and frying the chicken.
- Coarse Cracked Black Pepper: To be applied generously at the final stage.
How to Master the Panko-Crusted Fried Chicken
The heart of the Chicken Caesar Sandwich is the chicken. Achieving a golden-brown, juicy white meat interior requires a specific three-step dredging process.
Step 1: The Standard Breading Procedure
Start by setting up three shallow bowls. The first contains seasoned flour, the second contains beaten eggs, and the third contains your panko breadcrumbs. Take each chicken cutlet and coat it in flour, shaking off the excess. Dip it into the egg wash, then press it firmly into the panko.
Pro Tip: Press the panko into the meat with the palm of your hand. This ensures the crust doesn’t fall off during the frying process, giving you that iconic food blogger aesthetic look.
Step 2: The Perfect Shallow Fry
Heat your oil in a large skillet over medium-high heat. You want the oil to be shimmering but not smoking. Carefully lay the chicken in the pan. Cook for 4-5 minutes per side until the exterior is a deep golden-brown.
Once cooked, let the chicken rest for at least 3 minutes on a wire rack. This prevents the bottom from getting soggy. After resting, slice the thick chicken breast into strips to reveal the succulent interior, just like the best prepared chicken dishes.
Toasting the Ciabatta for Maximum Flavor
Don’t just pop your bread in a toaster. To get those charred edges and visible air pockets, you need to sear them in a pan. Spread a light layer of butter or oil on the cut sides of the ciabatta and place them face down in a hot skillet. Press down slightly so the edges catch the heat and turn dark brown and crispy.
Assembly: Building the Visual Masterpiece
This is where your Chicken Caesar Sandwich comes to life. Follow this order to maintain the structural integrity of the sandwich and maximize the vertical height for that perfect Pinterest photo.
1. The Dressing Drip
Toss your shredded romaine ribbons in a bowl with half of the Caesar dressing until they are thoroughly glossy. Spread a thin layer of dressing on the bottom bun to act as an anchor.
2. The Chicken Stack
Layer the sliced, panko-crusted chicken onto the bottom bun. Ensure the golden-brown crust is visible from the sides. If you want to try other flavors, this method also works well with creamy citrus profiles.
3. The Caesar Crown
Pile the dressed romaine ribbons high on top of the chicken. Add a heavy drip of extra dressing so it cascades down the side of the crunchy chicken. This creates the “heavy drip” look specified in our visual blueprint.
4. The Finishing Touches
Top the greens with your shaved parmesan curls and a generous dusting of coarse cracked black pepper. Place the charred ciabatta top at an angle to show off the layers.
Expert Tips for the Best Chicken Caesar Sandwich
- Temperature Control: Ensure your chicken is at room temperature before frying to ensure the “juicy white meat” remains tender and doesn’t dry out.
- Bread Selection: If you can’t find ciabatta, a crusty baguette or sourdough is a great substitute, but avoid soft brioche as it may collapse under the weight of the dressing.
- The Dressing: If using store-bought, whisk in a squeeze of fresh lemon juice and a teaspoon of anchovy paste to give it that authentic, high-end restaurant punch.
- Pepper Choice: Always use a pepper mill set to “coarse.” Pre-ground pepper won’t give you the visual contrast or the floral heat required for this dish.
What to Serve with Your Sandwich
A sandwich this substantial needs sides that provide a fresh contrast. We recommend pairing it with parmesan asparagus fries or a light zucchini chickpea skillet. If you want to keep it classic, a handful of kettle-cooked chips provides even more crunch.
Storage and Reheating Instructions
The Chicken Caesar Sandwich is best enjoyed immediately to appreciate the contrast between the hot chicken and cold lettuce. However, if you have leftovers:
Storage: Store the fried chicken, dressing, and greens in separate airtight containers in the refrigerator for up to 2 days.
Reheating: Reheat the chicken in an air fryer at 375°F (190°C) for 3-4 minutes to restore the panko crunch. Toast the bread separately. Do not reheat the romaine or dressing.
Frequently Asked Questions
To prevent sogginess, store the fried chicken, dressing, and shredded romaine separately. Assemble just before eating, or at least keep the dressing in a separate container until you are ready.
Use a thick, high-quality Caesar dressing and toss your lettuce ribbons in it first. Once assembled, add one final spoonful of dressing right at the edge of the chicken so it cascades naturally.
Using panko breadcrumbs instead of traditional crumbs creates a larger surface area for crunch. Also, let the chicken rest on a wire rack after frying to prevent steam from softening the bottom crust.
While grilled chicken is a healthier option, a panko-fried chicken breast provides the classic ‘Crunchy Caesar’ experience that contrasts perfectly with the creamy sauce and soft bread.
Ciabatta is the best choice because its sturdy structure and air pockets hold the creamy dressing without becoming soggy. It also toasts beautifully with charred edges.
The Ultimate Chicken Caesar Sandwich Recipe

Chicken Caesar Sandwich with Crispy Panko Fried Chicken
Ingredients
Equipment
Method
- Dredge chicken cutlets in flour, dip in beaten eggs, and coat thoroughly with panko breadcrumbs, pressing firmly to adhere.
- Heat oil in a skillet over medium-high heat. Fry chicken for 4-5 minutes per side until golden-brown and cooked through. Rest on a wire rack.
- In the same skillet, toast the sliced ciabatta rolls face-down until the edges are charred and crispy.
- Toss romaine with dressing. Slice chicken and place on ciabatta. Top with dressed romaine, parmesan curls, extra dressing, and cracked black pepper.
Notes
Reheat chicken in an air fryer to maintain the panko crunch.
Save This Recipe to Pinterest!
Love this Chicken Caesar Sandwich? Make sure to pin it to your “Lunch Ideas” or “Crispy Chicken” board so you never lose it! If you make this at home, we want to see your results. Take a photo of your sandwich—especially that beautiful dressing drip—and share it in the comments below. Don’t forget to leave a 5-star rating if this is the best Caesar sandwich you’ve ever had! Follow @kit_char for more restaurant-style recipes made easy at home.